What is volume shadow copy?
Volume Shadow Copy is a service that creates and maintains snapshots (“shadow copies”) of disk volumes in Windows 7 and Vista. It is the back-end of the System Restore feature, which enables you to restore your system files to a previous state in case of a system failure (e.g. after a failed driver or software installation).
Does volume shadow copy protect only my system files?
No. Volume Shadow Copy maintains snapshots of entire volumes. By default, it is turned on for your system volume (C:) and protects all the data on that volume, including all the system files, program files, user settings, documents, etc.
How is this different from what’s in Windows XP?
In Windows XP, System Restore does not use the Volume Shadow Copy service. Instead, it uses a much simpler mechanism: the moment a program attempts to overwrite a system file, Windows XP makes a copy of it and saves it in a separate folder. In Windows XP, System Restore does not affect your documents – it only protects files with certain extensions (such as DLL or EXE), the registry, and a few other things (details). It specifically excludes all files in the user profile and the My Documents folder (regardless of file extension).
When are the shadow copies created?
Volume shadow copies (restore points) are created before the installation of device drivers, system components (e.g. DirectX), Windows updates, and some applications.
In addition, Windows automatically creates restore points at hard-to-predict intervals. The first thing to understand here is that the System Restore task on Vista and 7 will only execute if your computer is idle for at least 10 minutes and is running on AC power. Since the definition of “idle” is “0% CPU usage and 0% disk input for 90% of the last 15 minutes, plus no keyboard/mouse activity” (source), it could take days for your machine to be idle, especially if you have a lot of programs running in the background.
As you see, the frequency with which automatic restore points are created is hard to estimate, but if you use your machine every day on AC power and nothing prevents it from entering an idle state, you can expect automatic restore points to be created every 1-2 days on Windows Vista and every 7-8 days on Windows 7. Of course, the actual frequency will be higher if you count in the restore points created manually by you and those created before software installations.
Here’s a more precise description: By default, the System Restore task is scheduled to run every time you start your computer and every day at midnight, as long as your computer is idle and on AC power. The task will wait for the right conditions for up to 23 hours. These rules are specified in Scheduled Tasks and can be changed by the user. If the task is executed successfully, Windows will create a restore point, but only if enough time has passed since the last restore point (automatic or not) was created. On Windows Vista the minimum interval is 24 hours; on Windows 7 it is 7 days. As far as I know, this interval cannot be changed.
What cool things can I do with Volume Shadow Copy?
- If your system malfunctions after installing a new video card driver or firewall software, you can launch System Restore and roll back to a working system state from before the installation. If you can’t get your system to boot, you can also do this from the Windows Setup DVD. This process is reversible, i.e. your current state will be automatically saved as a restore point, to which you can later go back. (Note: System Restore will not roll back your documents and settings, just the system files.)
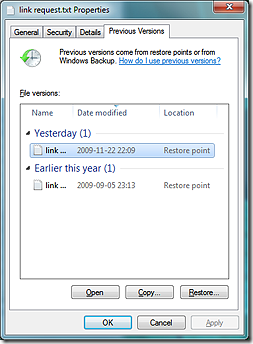
 If you accidentally delete 10 pages of your dissertation, you can right-click the document, choose Restore previous versions, and access a previous version of it. You can open it (in read-only mode) or copy it to a new location.
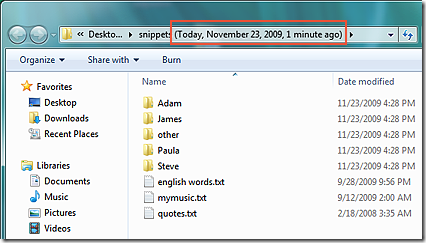
- If you accidentally delete a file or folder, you can right-click the containing folder, choose Restore previous versions, and open the folder as it appeared at the time a shadow copy was made (see screenshot below). All the files and folders that you deleted will be there!

Note: While the Volume Shadow Copy service and System Restore are included in all versions of Windows Vista, the Previous versions user interface is only available in Vista Business, Enterprise and Ultimate. On other Vista versions, the previous versions of your files are still there; you just cannot access them easily. The Previous versions UI is available in all versions of Windows 7. It is not available in any version of Windows 8.
Is Volume Shadow Copy a replacement for versioning?
No. A versioning system lets you access all versions of a document; every time you save a document, a new version is created. Volume Shadow Copy only allows you to go back to the moment when a restore point was made, which could be several days ago. So if you do screw up your dissertation, you might have to roll back to a very old version.
Is Volume Shadow Copy a replacement for backups?
No, for the following reasons:
- Shadow copies are not true snapshots. When you create a restore point, you’re not making a new copy of the drive in question — you’re just telling Windows: start tracking the changes to this drive; if something changes, back up the original version so I can go back to it. Unchanged data will not be backed up. If the data on your drive gets changed (corrupted) for some low-level reason like a hardware error, VSC will not know that these changes happened and will not back up your data. (see below for a more detailed description of how VSC works)
- The shadow copies are stored on the same volume as the original data, so when that volume dies, you lose everything.
- With the default settings, there is no guarantee that shadow copies will be created regularly. In particular, Windows 7 will only create an automatic restore point if the most recent restore point is more than 7 days old. On Windows Vista, the minimum interval is 24 hours, but remember that the System Restore task will only run if your computer is on AC power and idle for at least 10 minutes, so it could take days before the conditions are right, especially if you run a lot of background processes or do not use your computer frequently.
- There is no guarantee that a suitable shadow copy will be there when you need it. Windows deletes old shadow copies without a warning as soon as it runs out of shadow storage. With a lot of disk activity, it may even run out of space for a single shadow copy. In that case, you will wind up with no shadow copies at all; and again, there will be no message to warn you about it.
How much disk space do Volume Shadow Copies take up?
By default, the maximum amount of storage available for shadow copies is 5% (on Windows 7) or 15% (on Vista), though only some of this space may be actually allocated at a given moment.
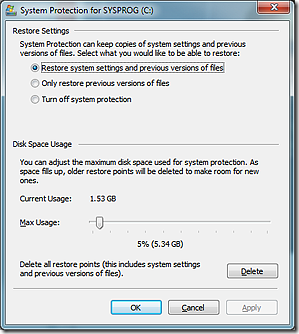
You can change the maximum amount of space available for shadow copies in Control Panel | System | System protection | Configure.
How efficient is Volume Shadow Copy?
It’s quite efficient. The 5% of disk space that it gets by default is usually enough to store several snapshots of the disk in question. How is this possible?
The first thing to understand is that volume shadow copies are not true snapshots. When a restore point is created, Volume Shadow Copy does not create a full image of the volume. If it did, it would be impossible to store several shadow copies of a volume using only 5% of that volume’s capacity.
Here’s what really happens when a restore point is created: VSC starts tracking the changes made to all the blocks on the volume. Whenever anyone writes data to a block, VSC makes a copy of that block and saves it on a hidden volume. So blocks are “backed up” only when they are about to get overwritten. The benefit of this approach is that no backup space is wasted on blocks that haven’t changed at all since the last restore point was created.
Notice that VSC operates on the block level, that is below the file system level. It sees the disk as a long series of blocks. (Still, it has some awareness of files, as you can tell it to exclude certain files and folders.)
The second important fact is that shadow copies are incremental. Suppose it’s Wednesday and your system has two shadow copies, created on Monday and Tuesday. Now, when you overwrite a block, a backup copy of the block is saved in the Tuesday shadow copy, but not in the Monday shadow copy. The Monday copy only contains the differences between Monday and Tuesday. More recent changes are only tracked in the Tuesday copy.
In other words, if we were to roll back an entire volume to Monday, we would take the volume as it is now, “undo” the changes made since Tuesday (using the blocks saved in the Tuesday shadow copy), and finally “undo” the changes made between Monday and Tuesday. So the oldest shadow copy is dependent on all the more recent shadow copies.
When I delete a 700 MB file, does VSC add 700 MB of data to the shadow copy?
No. When you delete a file, all that Windows does is remove the corresponding entry (file name, path, properties) from the Master File Table. The blocks (units of disk space) that contained the file’s contents are marked as unused, but they are not actually deleted. So all the data that was in the file is still there in the same blocks, until the blocks get overwritten (e.g. when you copy another file to the same volume).
Therefore, if you delete a 700 MB movie file, Volume Shadow Copy does not have to back up 700 MB of data. Because it operates on the block level, it does not have to back up anything, as the blocks occupied by the file are unchanged! The only thing it has to back up is the blocks occupied by the Master File Table, which has changed.
If you then start copying other files to the same disk, some of the blocks formerly occupied by the 700 MB file will get overwritten. VSC will make backups of these blocks as they get overwritten.
If VSS is constantly backing up blocks of data that get overwritten, what actually happens when a restore point is created if data is automatically being backed up anyway?
Not much — VSS simply starts backing up the data to a new place, while leaving the “old place” there (at least until it runs out of space). Now you have two places to which you can restore your system, each representing a different point in time. When you create a restore point, you’re simply telling VSS: “I want to be able to go back to this point in time”.
Note that it’s a mistake to think that VSS is backing up every change you make! It only backs up enough to enable you to go to a specific point in time. Here’s an example scenario to clear things up:
- You create a file (version #1)
- You create a restore point
- You change the file (resulting in version #2) — VSS backs up version #1
- A week later, you change the file again (resulting in version #3) — VSS doesn’t back anything up, because it already has version #1 backed up. As a result, you can no longer go back to version #2. You can only go back to version #1 — the one that existed when the restore point was created.
(Note that actually VSS doesn’t operate on files but on blocks, but the principle is the same.)
What are the security implications of Volume Shadow Copy?
Suppose you decide to protect one of your documents from prying eyes. First, you create an encrypted copy using an encryption application. Then, you “wipe” (or “secure-delete”) the original document, which consists of overwriting it several times and deleting it. (This is necessary, because if you just deleted the document without overwriting it, all the data that was in the file would physically remain on the disk until it got overwritten by other data. See question above for an explanation of how file deletion works.)
Ordinarily, this would render the original, unencrypted document irretrievable. However, if the original file was stored on a volume protected by the Volume Shadow Copy service and it was there when a restore point was created, the original file will be retrievable using Previous versions. All you need to do is right-click the containing folder, click Restore previous versions, open a snapshot, and, lo and behold, you’ll see the original file that you tried so hard to delete!
The reason wiping the file doesn’t help, of course, is that before the file’s blocks get overwritten, VSC will save them to the shadow copy. It doesn’t matter how many times you overwrite the file, the shadow copy will still be there, safely stored on a hidden volume.
Is there a way to securely delete a file on a volume protected by VSC?
No. Shadow copies are read-only, so there is no way to delete a file from all the shadow copies.
A partial solution is to delete all the shadow copies (by choosing Control Panel | System | System protection | Configure | Delete) before you wipe the file. This prevents VSC from making a copy of the file right before you overwrite it. However, it is quite possible that one of the shadow copies you just deleted already contained a copy of the file (for example, because it had recently been modified). Since deleting the shadow copies does not wipe the disk space that was occupied by them, the contents of the shadowed file will still be there on the disk.
So, if you really wanted to be secure, you would also have to wipe the blocks that used to contain the shadow copies. This would be very hard to do, as there is no direct access to that area of the disk.
Some other solutions to consider:
- You could make sure you never save any sensitive data on a volume that’s protected by VSC. Of course, you would need a separate VSC-free volume for such data.
 You could disable VSC altogether. (After disabling VSC, you may want to wipe the free space on your drive to overwrite the blocks previously occupied by VSC, which could contain shadow copies of your sensitive data.) However, if you disable VSC, you also lose System Restore functionality. Curiously, Windows offers no option to enable VSC only for system files. If you want to protect your system, you also have to enable Previous versions (see screenshot to the right).
- The most secure approach is to use an encrypted system volume. That way, no matter what temporary files, shadow copies, etc. Windows creates, it will all be encrypted.
Notice that VSC only VSC only lets you recover files that existed when a restore point was created. So if the sequence of events is as follows:
create file → create restore point → make encrypted copy → overwrite original file
the original file will be recoverable. But if the sequence is:
create restore point → create file → make encrypted copy → overwrite original file
you are safe. If you make sure to encrypt and wipe files as soon as you create them, so that no restore point gets created after they are saved on disk in unencrypted form, there will be no way to recover them with VSC. However, it is not easy to control when Windows creates a restore point; for example, it can do it at any time, just because your computer happens to be idle.
Can I prevent VSC from keeping snapshots of certain files and folders?
Yes, but you have to edit the registry to do that. Here are detailed instructions from MSDN.
What happens when VSC runs out of space?
Most of the time, most of the data on your disk stays unchanged. However, suppose you uninstall a 5 GB game and then install another 5 GB game in its place. This means that 5 GB worth of blocks got overwritten and had to be backed up by VSC.
In such “high-churn” scenarios, VSC can run out of space pretty quickly. What happens then? VSC deletes as many previous shadow copies as necessary, starting from the oldest, until it has enough space for the latest copy. In the rare event that there isn’t enough space even for the one most recent copy, all the shadow copies will be deleted. There are no partial copies.
Thanks to Adi Oltean, who was one of the engineers of Volume Shadow Copy at Microsoft, for answering my questions on the subject.


