Things I’ve learned, published for the public benefit
Hope This Helps header image

Review of the Steelcase Gesture chair

Photo of the Steelcase Gesture chair

This review is part of my series of reviews of ergonomic office chairs. People have wildly varying opinions when it comes to chairs, and you should always test a chair for a few days in your own work environment before buying it. (See more advice on how to buy a good chair.) Don’t use my reviews to decide which chair to buy; use them as a starting point for your own testing.

When I first sat on the Gesture at my local Steelcase showroom, I liked it the most of all the Steelcase chairs because the backrest offers heaps of support in the lumbar area. Other models, like the Leap and the Please, seemed lacking in comparison. After two days of sitting on the Gesture, however, I learned that there is such a thing as excessive lumbar support. The foam in the lumbar section of the backrest is quite thick and an hour of non-stop sitting in the reclined position left me with a slight numbness in that area. (I should note here that my lumbar curve is deeper than average due to postural problems – if you have correct posture, what I’ve written above should apply even more.) I think a chair should offer more support in the lumbar region than in the thoracic region, but when reclining on the Gesture, I felt like I was sitting exclusively on my lumbar spine. The lesson I took away is that something that feels great when you try it for 15 minutes can get tiresome after several hours.

My test chair had the optional height-adjustable lumbar support, which is just a piece of hard plastic that provides extra rigidity. After using it for a while, I found it completely unnecessary – in fact, the built-in lumbar support was already excessive for me. Furthermore, the plastic bar kept sliding down and I had to readjust it every couple hours. I also noticed that the fabric on my test chair had small holes that had clearly been made by the adjustable lumbar.

Of course, all of the above is just my opinion, and it’s very possible that the lumbar-heavy quality of the Gesture would work great for you. Still, I would definitely advise paying attention to this when testing the chair. It is also worth noting that the firmness of the backrest on the Gesture is not adjustable (unlike on the Leap), so either it’s for you, or it isn’t.

The Gesture has a backrest of what I call the “sticky” type. Once you choose a recline angle, the backrest will tend to stay there, held in place by static friction. This enables you to put the backrest just the way you like it without fiddling with any controls. The cost is that it takes more muscle effort to move the backrest. The difference between the Gesture and the Leap is that when you recline on the Leap, the seat moves a little bit forward. In my opinion, this mechanical coupling of the seat and the back has no real advantages, and plenty of downsides (such as noise and the tendency to develop “backrest lag”), so I’m glad to see that Steelcase has done away with it in the Gesture.

The backrest on the Gesture is similar to the excellent, flexible backrest on the Leap. I didn’t make my own video of it, but here’s a clip from bkwtang’s detailed YouTube review. Notice how the lower part of the backrest flexes in response to movement and how far it reclines. The maximum hip angle is no less than 135°, which is considered the anatomically neutral position.

The backrest may be flexible, but it is heavier and less springy than on the Leap. While on the Leap it’s possible to effect a kind of low-amplitude rocking motion (which is probably a beneficial form of microexercise), the Gesture’s backrest is somewhat more static. When it comes to micromovements, then, the newest offering from Steelcase is a small step backwards.

There is a minor mechanical problem with the Gesture’s tilt limiter. It often won’t engage in the most upright position, even if you take your weight off the backrest. You have to reach back and pull the backrest with your hands, or rapidly bend over (not good for your spine). Here is where Bkwtang stumbles on the problem in his video. I’ve seen the exact same issue on two demo chairs that I tested. While disappointing on a $1000 chair, I consider this a minor niggle, because I don’t think a tilt limiter is very useful on a chair with the “sticky” type of backrest. The inherent friction makes it possible to maintain any recline angle you like without a tilt limiter. Still, if – for some reason I cannot fathom – you intend to use the upright lock, you should be aware of this issue.

Let’s move on to what for me is the biggest flaw of the Gesture: its thermal performance. Because Steelcase wanted to enable users to sit on the Gesture in a variety of positions, including sideways, they fitted it with the thickest seat cushion on the market. Since the thermal insulation provided by foam is directly proportional to its thickness, the result is that the Gesture is the hottest chair I’ve ever sat in, and I’m certainly not the only one who has this opinion – some Amazon reviewers call it the “swamp chair”. In my particular work environment (no air conditioning, normally > 27 °C indoors in the summer), it’s a deal-breaker, but if you use this chair in an office where it’s never hotter than 25 °C (77 °F), you will most likely not notice any problem. (Even a few degrees makes an enormous difference in the subjective feeling of warmth.)

By the way, don’t fall into the trap of thinking you can avoid the heat problem by choosing the right fabric. My demo unit was upholstered in a polyester fabric, which – according to Steelcase – is the coolest fabric choice (Atlantic – which is the European equivalent of Cogent: Connect). In reality, the fabric doesn’t matter. If you’re sitting on a few inches of foam (the best thermal insulator known to man), the milimeter-thick outer layer is negligible, so long as it’s not something crazy like plastic foil. (I did some fabric tests and discovered no discernible difference between polyester and wool fabrics of comparable thickness.)

There is also something weird about the way the cushion is profiled. Both I and one of my friends noticed that the cushion puts more pressure on the thighs than usual, with my friend describing it as “uncomfortable”. We human beings are designed to sit on our buttocks, not thighs, so this is probably not ideal from the point of view of ergonomics. Most likely it’s another adverse effect of designing a chair that tries to do too much.

The main thing everybody always talks about when they talk about the Steelcase Gesture are the armrests. This chair has the most adjustable armrests in the world. You can put them low (so they’re out of the way), high (e.g. for holding a tablet in front of your eyes), wide or narrow. You can easily pull them back if you like to sit close to your desk (or if you have to because of your eyesight) – they certainly won’t bump against the edge of your desk. Their adjustment range is even greater than on the legendary “4-D” armrests of the Steelcase Leap. (Again, I refer you to Bkwtang’s video.)

Unfortunately, there is one thing I don’t like about them – they’re covered in a high-friction rubbery material that pulls on your skin a bit when you move your forearms. As I like to place my right forearm on the armrest when I’m using the mouse (it increases precision, which I have experimentally verified by playing Far Cry 4), a rough surface hinders my forearm movements and forces me to move the mouse with my fingers, which is ergonomically verboten. It would be overstating the point to say that the Gesture fixes my forearms in one spot – skin and muscles are loose enough that I can move my forearm left–right and forward–backward even if my skin is fixed in one place – but it does take away the ability to slide around the armrest.

The armrests on the Gesture stay pretty level as you recline. There is a slight tilt that’s not there on the Leap, but I did not find that to be an issue.

On balance, I think the armrests on the Gesture are a small step backward compared with the Leap, Amia or Think. Yes, there’s even more adjustability, but the Leap’s armrests already do 100% of what I need them to do (which is mainly retract enough to allow me to sit close to my desk, and adjust inward so I can rest my forearms while touch typing), and they’re covered in a more pleasant, smoother material that doesn’t restrict my movements. In my book, the old champion remains unbeaten.

The Tom Test

Let’s check the Gesture against my checklist:

  • Easy changing between at least two positions (near-upright and reclined): Pass. The sticky backrest makes it trivial to adopt any position you like.
  • Open hip angle in the reclined position: Pass.
  • Lumbar support: Pass. The foam in the lumbar area was a bit too deep for me. There’s no way to adjust the depth of support, so I would advise extended testing.
  • Backrest should adapt to your back: Pass. Excellent flexible plastic backrest.
  • Seatpan must not be too long: Pass.
  • Micromovements: Pass, but just barely. The back mostly stays where you put it. You can rock, but only a tiny bit.
  • Armrests (if you care about them): Pass. Superb adjustability marred by rubbery caps.
  • Annoyances: Gets quite hot. Cushion in the seat feels a bit weird to some people. Upright lock is glitchy.

Final words

The Steelcase Gesture is a good chair for computer work, but it is a chair that shows how difficult it is to improve on the Leap. It fixes the Leap’s most nagging issue – the overdesigned backrest that may “lag” or make noises – but introduces two other significant problems: an overheating seatpan (with foam that feels a bit weird to sit on) and unnecessarily high-friction arm caps. Unlike on the Leap, the backrest curve is not adjustable, so its prominent lumbar profile is either for you, or it isn’t – for me, it was a bit too much, but I could live with it.

All of the issues I’ve listed above have a degree of subjectivity. If it never gets above 25 °C (77 °F) in your office, you probably won’t notice the thermal issues. If you don’t use armrests when typing or mousing, you won’t have a problem with the arm caps. You may or may not find the seatpan puts pressure on your thighs. And the lumbar-heavy backrest may be a perfect fit for your spine. The Steelcase Gesture is definitely worth trying out in your own workspace, but perhaps not as your first choice.

→ 36 Comments

How to buy a good ergonomic office chair

How important is your chair?

Reading marketing materials for high-end office chairs can leave you with the belief that the ingenious, scientifically researched solutions used in their products guarantee a healthy spine. However, I have yet to meet a physical therapist or orthopedic surgeon who would place a great emphasis on chairs, let alone advise spending $1,000 on an upmarket chair. Professional recommendations for patients who have (or want to prevent) back problems are quite different, and generally focus on three things: sitting less, moving more and avoiding things that overload your spine. It is therefore safe to assume that replacing your average $100 office chair with a $1,000 ergonomic model will only be a small piece of the back health puzzle – perhaps no more than 10 percent of the whole. This is why I wrote an entire FAQ on preventing back problems. You should probably read it if you’re a computer worker and you’re worried about the remaining mileage you can get out of your back.

Rule Number One

Never buy a chair without trying it out first in your own workspace. I cannot stress this enough. The worst thing you can do is read a bunch of Amazon reviews and buy the chair that got the highest average rating, or the chair that all your friends are raving about. People have wildly differing bodies, working habits and preferences. I was made aware of this fact during a chair-testing marathon that I did together with two of my friends (B and P), who were also in the market for new office chairs:

  • B and I loved the Steelcase Leap, while P immediately eliminated it because of the “sticky” backrest that doesn’t provide enough support as you lean forward.
  • I found the Steelcase Please very comfortable, but I didn’t like the armrests; to B, it felt about as comfortable as a wooden plank, but he didn’t mind the armrests (which he doesn’t use anyway).
  • P and I both loved the Steelcase Think, while B found that the plastic strings in the backrest dug into his back.

The second worst thing you can do is to buy a chair after testing in the store for 30 minutes, with no possibility of returning it. There are a number of reasons why it’s a bad idea:

  • An in-store test won’t expose certain issues. You won’t find out that the armrests keep bumping against your desk because they don’t retract far enough. You won’t notice that the seat gets uncomfortably hot after 1 hour of sitting. You won’t pay attention to that slightly sticky knob. Issues like that can really ruin your long-term experience.
  • An in-store test can also make you reject a chair prematurely. For example, if you’re testing a chair that feels harder than your current chair, it will initially seem uncomfortable, perhaps unacceptably so. But that impression can vanish after a day or two of sitting in the chair.
  • I don’t know about you, but I don’t like having the salesman over my shoulder.

The solution is to order from a vendor with a good return policy, or from a store that will allow you to test chairs for a few days before buying. In the office furniture business, companies frequently test-drive chairs in their own offices before they make a purchase – if you’re an individual, you just have to convince your local dealer to extend the same practice to you.

The virtues of changing your position

It is important to change your sitting position frequently. This allows you to spread the load among different sections of your spine, giving each section sufficient time to regenerate. At a minimum, your chair should enable easy switching between two positions:

  • the “near-upright” position
  • the “reclined” position
Two photos showing the author on a Leap chair in a near-upright and reclined positions

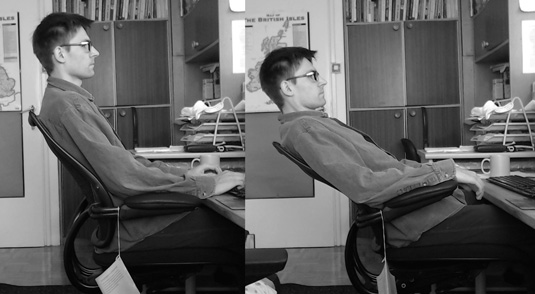
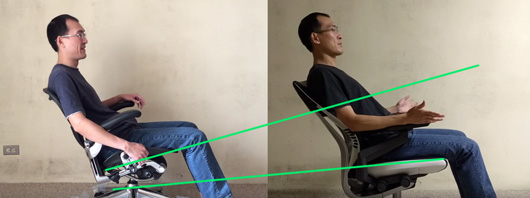
The near-upright position (~115°) vs. the reclined position (~130°)

The reclined position is a great way to take some load off your lumbar spine, which is the part of the spine that is the source of the vast majority of back pain episodes. Instead of having your spine bear the entire weight of your head and torso, you’re letting the backrest take some of the load. In addition, as you recline, you’re restoring the natural curvature of your lumbar spine. (See more discussion of the mechanics.)

Unfortunately, reclining also makes your neck muscles work harder to keep your head from dropping backwards. In addition, if you want to keep your gaze at screen level, you have to flex your cervical spine and stretch the muscles in the back of the neck. Finally, it is harder to type in this position. For these reasons, the reclined position is best used for short periods (say, less than 20 minutes) when you’re not typing a lot – for instance, when you’re thinking about what to write next, casually browsing the Web, or watching a short video. Your trunk in the reclined position should be at around 130°.

A headrest allows you to maintain the reclined position longer, but in my experience, the depth of the headrest has to be adjusted very precisely. Otherwise, your head will either drop too far back or stick forward – either situation results in a sore neck. Unfortunately, chairs with good, highly adjustable headrests are few and far between. Furthermore, although a good headrest will take some (but not all) load off your muscles, it won’t change the fact that your cervical spine is constantly flexed (so you can see the screen), putting pressure on your intervertebral discs and stretching the muscles that straighten your neck.

The near-upright position is much easier on your neck at the expense of your lumbar spine. Your trunk should be somewhere between 100° and 120° – I personally prefer to get closer to 120°. Of course, you can and should continually change this angle if your chair allows it. Wider angles transfer more stress from the lumbar region to your neck.

Types of recline mechanisms

Before we go any further, I should explain some terms that I will be using in this post. There are two major types of recline mechanisms in task chairs:

  • Smooth. This is the type you are probably most familiar with. It is found in your average low-end chair, as well as most high-end ones not made by Steelcase. If you put a little more weight on the backrest, it will recline. The further you recline, the more the backrest will resist your weight, which sets a “soft limit” on how far you can go. (Depending on the chair, resistance can rise slowly or quickly – if it rises slowly, you can recline further, but you also feel less stable.)
  • Sticky. This is used in most Steelcase chairs. With the smooth mechanism described above, the backrest reacts to your every movement – just putting your arms forward will often result in it tilting forward. With the sticky mechanism, the experience is quite different. As you push back, the backrest does not immediately recline – instead, it stays in place, as if it were a little stuck, until you apply enough force to overcome the static friction. Once it starts moving, you can easily put it at any angle you wish, as the backrest does not respond with increasing force – the resistance is practically the same across the whole range of motion, allowing you to put the back in any position you wish. In this sort of chair, what keeps you from dropping all the way back is not the spring-like resistance – it’s the static friction.

Here is a clip demonstrating a smooth mechanism on a Sedus Open Up chair. Notice that the backrest remains glued to my back, responding to my every move. Just bringing my arms closer to my body is enough to shift the balance and increase the recline angle. When I put my hands behind my head, my center of gravity shifts even more, resulting in a very large recline. The range of movement is limited by the increasing counterforce of the backrest – I cannot maintain a large recline without putting my arms behind me. To do so, I would have to use my muscles (until they got tired) or change the tension setting (which is a bit of a hassle).

And here’s a clip showing the sticky mechanism on the Steelcase Leap. Notice that small movements are ignored. When I move my arms around, the backrest flexes a bit, but the recline angle stays the same, held in place by static friction. In order to change the angle, I would have to do overcome the initial friction with my abdominal or back muscles. Once I do this initial work, my range of motion is unlimited. I can take any position (no matter how reclined) and maintain it without effort.

Recline mechanisms can also be classified along another dimension, which is independent of the smooth–sticky dimension:

  • Backrests with a tension control. The chair has a knob that lets you adjust the resistance of the backrest according to your weight and your preferred recline angle, with heavier users requiring more resistance. This is by far the most common type.
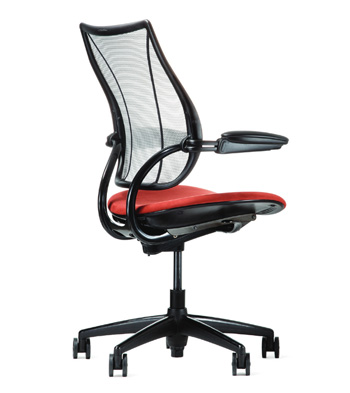
  • Backrests with a weight mechanism. The resistance is automatically determined by your weight (the seat is connected to the recline mechanism). The idea is that users of different weights can sit on the chair, and the chair will automatically adjust the backrest resistance, so that they can all sit in roughly the same “optimal” position. This is especially handy in work environments in which one chair gets used by many different people. Example chairs that use this type of mechanism are the Humanscale Liberty and the Steelcase Think.

Easy changing between at least two positions

For reasons explained two sections earlier, you need a chair that, at a minimum, enables you to easily switch between two positions: the near-upright position and the reclined position. Of course, to do that, a chair must offer a properly reclined position (around 130°) in the first place.

Generally speaking, smooth backrests have difficulty with easy position switching. If you set the backrest for the near-upright position, then you cannot recline very far. The reason is that the resistance will go up quickly. You can use your muscles to force a reclined position, but this takes a lot of work and is impossible to maintain for any significant amount of time. You can make it a bit easier by putting your hands behind you, but then you cannot operate the keyboard and mouse, so the reclined position ends up being limited to passive activities like movie-watching.

The proper way to recline would be to turn the tension knob and lower the backrest resistance. Now you can recline easily, but you’ve traded away the near-upright position! If you try to sit upright, you will find that the backrest does not provide adequate support, so you have to use your abs or you drop back. Exaggerating a little, a smooth backrest mechanism only offers one position for a given resistance setting. Of course, the backrest is highly mobile and you can rock back and forth around some center point – just not very far and not for very long.

In the case of “smooth” chairs with a weight mechanism instead of adjustable resistance, your options are even more limited. On a standard chair, you can at least change your position by turning the tension control knob – with a weight mechanism, your position is determined by your weight. The chair’s designers picked a recline angle that they considered optimal, and the weight mechanism is supposed to ensure that every user sits at this angle, regardless of their body weight. If an adjustable-tension chair only allows one position for any given resistance setting, a chair with weight-based resistance only allows one position – the one selected by the chair’s designer. There are exceptions to this rule – for instance, the Steelcase Think chair has a weight mechanism with an additional, easy-to-reach knob that lets you choose between “weight-based resistance” and “weight +20%”, thus satisfying the requirement of enabling easy position changes (though not without some mechanical shortcomings).

Let’s go back to chairs with adjustable resistance. As I mentioned above, you can switch between a near-upright position and a reclined position by turning the resistance knob. However, this doesn’t work in practice, because tension controls on chairs are continuous. Imagine you’ve just spent 5 minutes fiddling with the knob to get your preferred upright position. After working for a while, let’s say you want to watch a cat video – a perfect opportunity to give your back a bit of rest. In order to recline, you turn the knob a few times to lower the resistance. Big mistake. You see, there is no back button that lets you just go back to your previous backrest resistance. When you’re done watching that video, you’re going to have to painstakingly recreate the original position of the knob with no visual or tactile cues to guide you. Try it once, you’ll never do it again. Even putting that aside, the fact that you typically have to turn the resistance knob several times to go from a near-upright to a reclined position will surely dampen your enthusiasm for healthy position changes.

There are chairs with discrete resistance controls, but I haven’t seen one where the number of steps would be smaller than 7. This means that you’ll have to turn the knob through a few “clicks” before you go from upright to reclined. Turning a knob 3 steps left every time you want to recline, and then 3 steps right when you want to be upright again, while dramatically better than the continuous option, is still not the height of convenience. A good chair should make it super-easy to change positions; otherwise, the user will just avoid the hassle and work in the same position for hours, which is a complete ergonomic disaster.

Well, what about locks and tilt limiters? Don’t they help? Let’s define our terms first. A lock freezes the backrest so that it can move neither forward nor back; typically, this is enabled by pushing the backrest into the desired angle and then engaging some kind of lever. A tilt limiter is a hard limit on the backward movement – the backrest can still move forward; typically, you select one of a few angles using a lever or knob. These mechanisms have some problems, most of which are not inherent, but rather the result of the way they are typically implemented:

  • The lock/limiter control often isn’t terribly easy to reach. This is a real problem because it discourages you from changing your position.
  • It may be necessary to perform some extra gymnastics before the chair will allow you to disengage a tilt limiter or a lock. For example, on the Aeron, you have to bend forward (see video example). Other chairs may have other mechanical constraints.
  • If you set your backrest to a low resistance and rely on a lock/limiter to stay upright, it will be hard to go from a reclined to an upright position. The backrest won’t provide a lot of forward force, so you’ll have to work your abs (compressing your spine in the process).
  • If you set your backrest to a high resistance and rely on a lock to stay reclined, you will have to use a lot of force to effect a recline that you can lock into (again compressing your spine).
  • If the backrest does not have a lot of inherent flexibility, a tilt limiter or lock can freeze your back in one position without the possibility of micromovements (which is suboptimal for reasons detailed below). Hitting a tilt limit can also feel unpleasant (here’s a video example).

Large hip angle

When you’re sittting upright, your lumbar spine is actually bent, putting backwards pressure on your intervertebral discs. The degree of flexion depends on the angle between your thighs and your trunk (the hip angle). Your spine is in a neutral position when the hip angle is 135°.

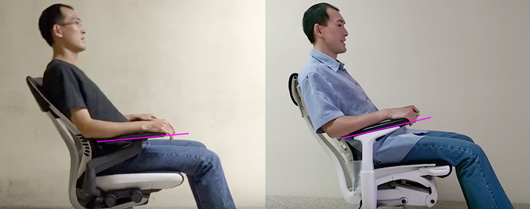
Therefore, it is good to have a chair that opens up your hip angle as you recline. The fact that a chair has a good recline angle does not mean that it opens up your hip angle. For example, in the Herman Miller Aeron chair, the seat tilts back almost at the same rate as the backrest – if you recline by 10°, the seatpan will also tilt back by something close to 10°. This means that, at maximum recline, the hip angle is only a bit larger than in the upright position! Reclining on the Aeron is still beneficial, because you’re transferring load from your spine to the backrest – but it’s not as beneficial as it could be if the chair also let you un-flex your lumbar spine.

A person sitting on a Herman Miller Aeron and a Steelcase Gesture

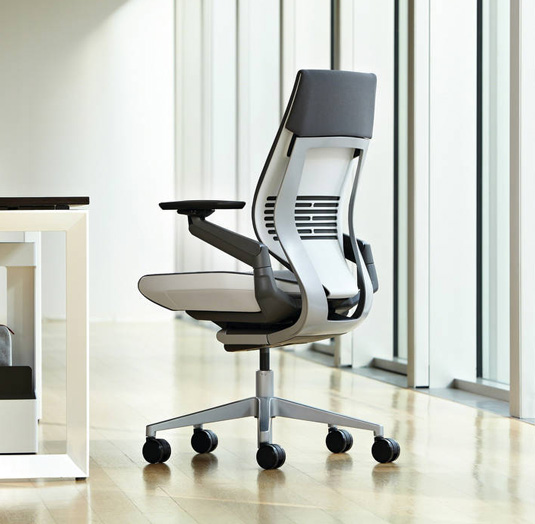
The seat on the Aeron chair (left) tilts back together with the backrest – as a result, the hip angle is only 115° in the maximally reclined position. By contrast, the seat on the Steelcase Gesture (right) tilts only slightly, allowing a very open hip angle of 135°. Source: bkwtang’s reviews of the Aeron and Gesture.

Micromovements (“rockability”)

It’s a good idea to pick a chair which allows you to rock back and forth around your chosen backrest position. Small movements are gentle exercise for your core muscles; they also improve your circulation, delivering more oxygen into the brain – though obviously they cannot replace standing up and walking around, for example.

The nice thing about chairs with smooth backrest mechanisms is that they give you micromovements “for free” (except when you’re using a lock or a tilt limiter). Here’s an example clip from an online video on the Herman Miller Embody:

Chairs with sticky backrests, by nature, are not very good in the micromovements department. The backrest maintains its recline angle until you exert significant force. However, many chairs of this type have flexible backrests which permit limited back-and-forth motion. Here’s a Steelcase Leap, which is pretty good for a sticky chair:

This is definitely less fun and less healthy than rocking with a smooth backrest, but it’s better than nothing.

Sticky or smooth backrest – a recap

I’ve said a lot of different things about sticky and smooth backrests, so let’s recap the unique strengths of each backrest type:

  • A smooth backrest gives you rockability (but only in one position, because you’ll probably want to use the tilt lock/limiter to stay upright, which makes it impossible to rock)
  • A sticky backrest gives you easier switching between positions (you don’t have to mess with any knobs or levers) and allows you to pick any position (not just one of the pre-defined positions)

From a spine health perspective, easy position switching is probably more important than micromovements – therefore, speaking in the abstract, chairs with sticky reclining mechanisms have an advantage. In practice, however, it all comes down to the particular implementation: how fiddly is the tilt limiter? how much micromovement does a sticky backrest allow? how “sticky” is it? etc.

Lumbar support

As discussed above, when you’re sitting upright, your lumbar spine is flexed. This flexion pushes your intervertebral discs backwards, where they can eventually bulge out and press on your nerves. The best way to un-flex your lumbar spine is to stop sitting in an upright or near-upright position – unfortunately, this kind of position is more or less necessary for intensive computer work. There is, however, a way to mitigate the problem – a chair with a lumbar support will reduce lumbar flexion in the upright position.

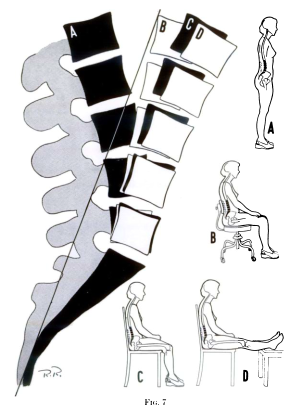
Here is a figure from Jay Keegan’s classic 1953 paper. Note that going from a basic chair (C) to a chair with lumbar support (B) brings you closer to a neutral position. (The neutral position is not pictured, but it’s about halfway between A and B.) The difference is not enormous, but it’s not insignificant, either.

X-ray tracing of the lumbar spine showing flexion in different positions

Therefore, an ergonomic backrest should be shaped in a way which fills your lumbar curve. There are two dimensions to this. First, the depth of the lumbar support should be sufficient (and preferably adjustable) – generally as deep as possible without causing discomfort over longer sitting sessions. It’s better to err on the side of more prominent support, because the health consequences of “slouching” your lumbar spine are more serious than those of maintaining an excessive curve. The vast majority of office chairs advertised as “ergonomic” do not offer lumbar support of sufficient depth.

Line drawing of a human model seated on an ergonomic chair

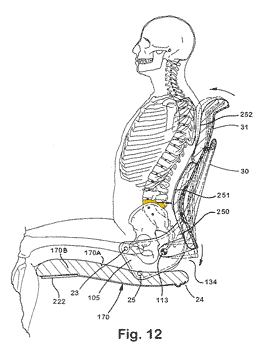
Model seated on a Steelcase Leap prototype. The apex of the lumbar support aligns with the 4th lumbar vertebra (marked in yellow). The bottommost lumbar vertebra is hidden behind the pelvis. (adapted from this Steelcase patent)

The second dimension is the height. The critical area which needs to be supported is the lowest two lumbar vertebra, because that’s where 95% of all spinal herniations occur. To locate it, reach to your back and feel the top edge of your pelvis (posterior iliac crest). You can also try to feel the first vertebra that comes out of your sacrum (it’s easier to do this when bending over). If the lumbar support is too high, it can leave a gap and allow the lowest two lumbar vertebra to flex. As a rule of thumb, I would disqualify any chair in which the apex (most protruding part) of the lumbar support is more than 20 cm (8 inches) above the seatpan.

Many chairs have height-adjustable lumbar supports. This is generally a good idea, because people’s spines come in different heights. However, lack of vertical adjustability is not a dealbreaker. It is possible to design a chair that has a fixed lumbar support at a height that works for most users.

In most chairs, a “lumbar gap” appears between your lower back and the backrest as you recline. This is caused by the fact that the backrest doesn’t rotate around the point where your back rotates (which is close to the point where the backrest meets the seat). It rotates where the mechanism is located, which is somewhere under the seat. This difference in centers of rotation means that the lower part of the backrest has to move further and further away from the seat as you recline. This means that your lower back has less and less support. Here’s a quick visual explanation:

A simple drawing showing a backrest in an upright position and a reclined position.

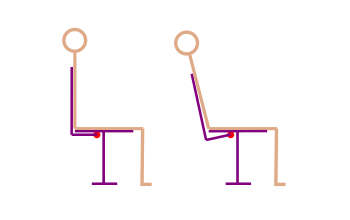
The backrest, rotating around a point under the seat (red dot), moves away from the seat and no longer supports the user’s lower back.

Some chairs, like the Humanscale Liberty or Steelcase Please, have a special construction that eliminates this, and on the better chairs, this will be not so much a “gap”, but a gradual loss of support (I think it depends on the center of rotation, and possibly on other mechanical considerations, as well as the adaptability of the backrest).

While good lumbar support across the whole range of recline can significantly increase your comfort level, I do not think it is a serious problem for spine health if a chair doesn’t have it. Although in the upright position your lumbar area should always be supported to prevent flexing that part of the spine more than it needs to be flexed, in the reclined position this is less important for two reasons: (1) the weight borne by the lumbar spine is much smaller (the backrest bears a large part of it), and so the pressure on intervertebral discs will be smaller as well, and (2) your lumbar curve automatically deepens in the reclined position, so slouching becomes harder. (I imagine a lumbar gap could be a problem for back patients who are sensitive to motion in that part of the spine.)

Backrest flexibility

People have very different backs. What’s more, each person’s back changes its shape depending on the recline angle (the spine does not work as a single unit). That is why any ergonomic chair worth its salt must have a backrest that adapts to your back. The two most common implementations are flexible plastic backrests (Leap, Gesture) and mesh backrests (Humanscale Liberty, Herman Miller Aeron). Both can work very well, with the mesh backrests having the added advantage of much better airflow.

Some chairs also have a knob that increases or decreases the curviness of the backrest, as in the Leap and Embody. This is good (more adjustments is always better in my book), but not essential.

Seatpan

The seat pan should not come up to your knees. A seat pan that’s too short is better than one that’s too long. A too-long seatpan will make it harder to move your legs (remember, it’s healthy to change position) and to get out of the chair. It is just not very comfortable. A short seatpan will be fine because people sit on their butts, not on their thighs.

According to conventional ergonomic wisdom, the seat pan should tilt back a little when you recline. When you push your back against the backrest, your butt will go up. A tilted seatpan stops it from sliding forward. I don’t think it’s a big deal if the seatpan doesn’t tilt (Humanscale Liberty) or tilts in an almost imperceptible way (Steelcase Leap, Think) – but then I would recommend choosing a high-friction fabric to prevent slipping. For reasons described in the hip angle section, the seatpan should not tilt too much – otherwise, it will prevent you from opening up the angle between your legs and torso. Another issue is that when the seat tilts, your butt will drop down with respect to your desk, which can make it harder to use the keyboard and screen.

Be careful with chairs that have adjustable seatpans. On some models, it is possible to slide the seatpan forward so far that you can no longer comfortably sit with your butt all the way back because you end up falling into a “hole”.

Armrests

The way I see it, armrests on an office chair achieve two things:

  • They take some load off your spine. Your arms weigh something like 5 kg. I’m not sure if your spine will notice the difference, since it normally bears more than 50 kg (the weight of your head and torso), but multiply it by 40 years of sitting and it could add up.
  • They increase your precision when using the mouse. When your forearm is resting on something, you can move the mouse pointer more accurately. This is most apparent when playing reflex-based games (first-person shooters, real-time strategy games).

On the other hand, armrests can have serious disadvantages. The most important one is that hard, poorly adjustable armrests can cause permanent disability. I have actually met a guy who permanently damaged the ulnar nerve in his arms by resting his elbows on armrests – now his hand movement is impaired and he’s officially disabled. If you’re going to use armrests, make sure they’re soft. Be sure to adjust them so that there’s no pressure on your ulnar nerve (the same nerve that causes the “funny bone” effect). It’s also probably good if they are sloped toward the back, so that the bulk of the weight is on your forearms, rather than your elbows.

Photo of a man reclining on the Aeron chair

Armrest Fail. If you recline on some chairs, the armrests will take your hands away from your desk. (Source: bkwtang’s video review of the Aeron)

When you recline, the armrests should stay relatively level. If they tilt together with the backrest, they will tear your hands away from your desk (see picture on the right). A small amount of armrest tilt is acceptable – if the armrests are soft, you may still be able to keep your hands on your desk fairly comfortably. In fact, I only know two chairs in which the armrests stay totally level, regardless of the angle of recline – the Steelcase Leap and Steelcase Think.

There’s also the issue of personal preferences. In my experience, there are two kinds of people: those who like armrests and those who don’t. If you are in the latter group, you could consider yourself lucky. It’s much easier to find a good chair if you don’t care about armrests.

In general, my opinion on armrests is that if you’re going to use them, they have got to be very good armrests. Here’s what this means:

  • must be soft (prevents ulnar nerve injury)
  • not too much friction (otherwise, it’s hard to move your mouse while resting your forearms on them)
  • they cannot prevent you from pulling up your chair as close to your desk as you like (i.e. avoid long armrests that don’t slide backward far enough) – otherwise, you may be inclined to leave a gap between your back and the backrest to compensate, which encourages slouching
  • it must be possible to adjust them inward so that you can comfortably rest your forearms on them while keeping your fingers on the “home row” when touch typing (this eliminates at least of 50% of armrests – most are too wide)
  • when you recline, they should stay relatively level
  • fine-grained height adjustment, so that you can position them just below your desk level (your arms have to be supported, but you should also be able to easily take your forearms off them if you need to make large movements)

It’s pretty hard to find armrests that meet all of these requirements. The armrests on the Herman Miller Aeron tilt as you recline, tearing your hands away from your desk. The Embody‘s are too long and won’t let you sit close to your desk. Even the Steelcase Gesture, with the most adjustable armrests on the market, isn’t perfect – the rubbery material has too much friction. The only armrests that have no real weaknesses are the “4-D” Steelcase armrests found on the Leap, Amia and Think (the Think version is a bit harder and doesn’t have as much in/out adjustability, so it’s a bit worse). If you don’t like those armrests, you don’t like armrests, period.

Recap (the Tom Test)

Here’s a checklist of features that a good chair should have:

  • Easy changing between at least two positions (near-upright and reclined)
  • Open hip angle in the reclined position (at least 125°)
  • Micromovements (rockability)
  • Lumbar support
  • Seatpan must not be too long
  • Backrest should adapt to your back
  • Armrests (if you care about them) – see Armrests
  • No annoyances (poor thermals, fiddly controls, hard edges, etc.)

And I hope you haven’t forgotten Rule Number One: Never buy a chair without trying it out first in your own workspace!

How to sit on your ergonomic chair?

See my back health FAQ, especially this question.

Chair reviews

In this series of blog posts, I will be posting short reviews of popular ergonomic chairs that I’ve had the opportunity to try out in my workspace. Stay tuned!

→ 11 Comments

How to prevent back problems – FAQ for computer workers

Introduction

Let’s assume, for the sake of discussion, that you’re like me. You spend 12 hours a day in front of your computer, and if you didn’t have to eat and sleep, you would probably spend all day. Maybe you started feeling some soreness in your lower back after long coding sessions. Maybe you’ve got a techie friend who lived in front of his computer and is now struggling with debilitating back pain, even though he’s not even 40. You’re wondering what would happen if your back problems rendered you incapable of working on your computer.

You are probably right to worry. Once you break (herniate) an intervertebral disc and have the gooey stuff bulge out, the disc won’t un-break itself. Although the pain may go away, it can always come back when you make the wrong movement with your spine. And back pain is no joke. Imagine pain so bad that you cannot do any kind of work, move around, or even think of anything other than the pain. Back pain can make you feel like your life has been shattered and plunge you into an existential crisis.

In this FAQ, I have compiled a list of questions and answers which represents my current understanding of the topic. Please note I am not a medical professional. All I know comes from my personal research, my limited experience with back exercises, and conversations with specialists (physical therapists, orthopedic surgeons). My primary book references were Low Back Disorders and Back Mechanic by Stuart McGill, professor of spine biomechanics at the University of Waterloo.

This FAQ is about prevention. If you are in pain, you should probably consult a specialist. You might also want to read Back Mechanic, which describes ways to diagnose your particular back pain, learn movement patterns that avoid aggravating your pain points, and exercise to enable proper muscle support.

How exactly do you get back pain?

Your spine is made up of bones (vertebrae) with gel-like discs sandwiched between them. When one of the intervertebral discs breaks (herniates), the gooey contents bulge out and start pressing on the nerves that run along the back of the spine. This hurts like seven hells.

Typically, it’s one of the two bottommost discs that gives out. Why? Because lower discs have to bear more of your body’s weight than higher discs. The second most common area where disc herniations occur is the neck, probably because of all the bending that goes on in that part of the spine.

Watch this video for a very good visual explanation.

(I should note that the above story is just the most well-understood cause of back pain. It has been pointed out that a large number of cases of low back pain – perhaps a majority – are not caused by an obvious skeletal problem. Instead, the problem could originate with muscles or nerves.)

What causes an intervertebral disc to break?

Repeated bending of your back. When you bend over or do sit-ups, you are flexing your lumbar spine. This creates a force that pushes the contents of an intervertrebral disc backwards. The force is even larger if your spine is not just bearing the weight of your body, but also the weight of some heavy object.

In 2001, Jack Callaghan and Stuart McGill performed experiments on pig spines. With each flexion and extension of the spine, they could see the disc material traveling towards the back. Given enough flexion cycles, they were able to break discs even when the compressive force was moderate, on the order of 100 kg.

Lack of motion. Intervertebral discs are made up of living cells and they need to receive nutrients and get rid of waste products. Regular exercise appears to enhance this, possibly by improving microcirculation at the edge of the disc. In 1983, Sten Holm and Alf Nachemson found that, in dogs that exercised regularly over three weeks, intervertebral discs were more efficient at absorbing substances and expelling waste products than in dogs that were more sedentary (disturbingly, to acquire this result, 21 labradors had to be killed by lethal injection and their spines extracted and examined in vitro). Interestingly, the effect appeared only if exercise was carried out over the long term, which suggests that disc nutrition is not some simple mechanical result of movement, such as changes of pressure in the disc. (Here’s a recent scientific review on disc nutrition for more on this topic.)

But is sitting in itself bad or your back, or is it perfectly healthy to sit for 8 hours a day as long as you also get regular exercise? The jury is still out, but the best evidence we’ve got suggests that people who sit a lot do not appear to have a higher likelihood of experiencing back pain. (However, there is more and more evidence that sitting hurts your body in other ways – for example by increasing your risk of certain cancers – regardless if you exercise. Paul Ingraham has a nice overview of the risks of sitting.)

In short, sitting by itself probably doesn’t harm your back, provided that you get enough exercise. Far worse than sitting is bending your back while lifting heavy objects or doing exercises like sit-ups or deadlifts. In fact, as noted by Stuart McGill here, couch potatoes often have pain-free backs; it’s the people who work their butts off in the gym that are often crippled with pain.

What to do?

Here’s my list of recommendations for computer workers who want to prevent back problems. (Once again, I’m not a medical professional, so take it with a grain of salt.)

  1. Don’t bend your back, especially under load.
  2. Be more mobile.
  3. When you sit, change your position often.
  4. Learn to sit in your chair properly.
  5. Get more exercise, especially back-muscle exercise that doesn’t bend your spine.
  6. Learn to lift things safely.
  7. Have a good chair (see“How to buy a good ergonomic office chair”).

How can I be more mobile?

Taking breaks can make an enormous difference, as it gives your spine (and your whole body) a chance to “catch a breath” and regenerate a little before you plant it in front of your computer again. For each activity that you do in the course of your day, ask yourself: do I have to be sitting while I do this?

  • Do you have to be sitting when you’re on the train to work?
  • Do you have to be sitting while you have your breakfast?
  • When you get a phone call at work, do you have to take it in your chair, or can you walk around the room as you talk?
  • If you need to talk something over with a colleague, do you have to be sitting or can you both take a short walk down the hall?

Just being on the lookout for opportunities to stand or walk around can make a significant difference. If that’s too minimalistic, the next step up from that is to get an exercise ball (AKA gym ball AKA Swiss ball) and sit on it for 15-30 minutes a day. Sitting on a Swiss ball is great because:

  • it keeps your spine moving – it’s impossible to sit motionless on a ball
  • it strengthens your back muscles (which is good because strong muscles can help you maintain proper spine alignment – more on that later)
  • it’s fun (you can bounce!)
  • you can work on your computer as you do it – as long as you don’t think sitting on a huge inflatable ball is embarrassing

At much greater expense, you can get a standing desk and use it for an hour or so every day. Standing has the following beneficial effects:

  • it puts your spine in a neutral position (although you cannot transfer part of your body weight to the backrest, as you can when sitting)
  • it strengthens your back muscles
  • it makes you more mobile – (1) because it’s impossible to stand motionless for any significant amount of time, and (2) because it makes you more likely to walk around the room (e.g. when thinking about what to write next) – the transition from standing to walking is more natural than from sitting to walking

It’s probably best not to stand for too long, as prolonged, near-motionless standing (such as you would experience when working at a standing desk) carries its own risks with it. Think of it more as an addition to your repertoire of working positions, not an outright replacement for sitting.

For further reading, check out Paul Ingraham’s overview of what he calls “microbreaking”.

Why should I change my position often?

“What is the optimal seated position?” “The next one.”

Much of ergonomic advice seems to assume (or at least unconsciously promote the assumption) that there is such a thing as the “optimal seated position”. A typical picture shows a person sitting upright or almost upright, with their elbows bent at a 90° angle:

Although this position is good for intensive typing, talking about the “ideal position” is a bit like talking about the “ideal food”. No one food can provide you with all the nutrients, just as no one position can guarantee you a healthy back. In reality, the key to a healthy back is changing your position frequently. The reason for this is that different positions put strain on different parts of the spine.

File:Illu vertebral column.jpg

Sitting in a reclined position takes stress off your lumbar spine. As you increase the recline angle above 90°, you will also start transferring some of your upper body weight onto the backrest of your chair. This reduces the compressive forces acting on your spine.

The other reason why a reclined position is easier on your lumbar spine follows from the fact that the natural shape of the lumbar spine is concave, as you can see in the above picture. But when you sit in an upright position, with a 90° angle between your hips and your torso, your lumbar spine is flattened, i.e. bent outward compared with its normal shape. Here are some X-ray-based drawings (from Jay Keegan’s 1953 paper) showing the degree of lumbar flexion in different positions. Notice that the upright seated positions (I J M N) flatten the lumbar spine more than reclined positions, with the exception of L, in which the subject essentially slouched (unlike in F, where the lumbar spine was supported by the chair, and G, where the subject maintained the proper curvature with his muscles).

Diagram showing angles of the lumbar spine in different positions

According to recent research by Nadine Dunk et al., the upright seated position puts the L5/S1 joint (the most failure-prone part of the spine located where the lumbar spine meets the sacrum) at 60% of its maximum range of motion. The flexion is even worse if you sit like the guy on the right.

This flexion of the lumbar spine in the upright position puts additional pressure on your intervertebral discs (see “What causes an intervertebral disc to break?”). Your lumbar vertebrae are in the best (neutral) position when you are reclined at 135°. However, nothing comes free. A reclined position puts strain on your cervical (neck) spine and the associated muscles, because you have to bend your cervical spine to keep your gaze on the monitor – and, by the way, the cervical spine is the second most common site of spine injuries. A reclined position also makes it harder to type on your keyboard, potentially leading to dangerous wrist and hand injuries.

In short:

  • sitting reclined relieves your lumbar spine, but stresses your cervical spine
  • sitting upright relieves your cervical spine, but stresses your lumbar spine

Changing your position balances things out, giving each section of your spine time to regenerate before something bad happens. To do this, you need two things: (1) a chair that enables easy position changes (more on how to buy a good chair), and (2) a habit of changing positions frequently. One technique that I find helpful is to recline in your chair whenever you’re not typing – for example, watching a YouTube video or reading some webpages.

How do I sit on my ergonomic chair?

The #1 mistake is not adjusting your chair:

  • Height – should be set so that your thighs are roughly parallel to the floor.
  • Backrest tension/resistance – should be set so that you are supported in your working position, but can recline without too much effort if you want to.
  • Seatpan depth – should allow you to sit your butt all the way back without falling into a “hole”; it should not come up to your knees (in fact, it’s all right to leave a lot of space between the seatpan and your knees) (see below)
  • Lumbar support height – Make sure the lowest part of the lumbar spine (L4-L5) is well-supported – 95% of all disc herniations occur at L4-L5-S1, so protecting that area is vital. To locate it, reach to your back and feel the top edge of your pelvis (posterior iliac crest). You can also try to feel the first vertebra that comes out of your sacrum (it’s easier to do this when bending over). If the lumbar support is set too high, it can leave a gap and allow the lowest part of the lumbar spine to flex. If your chair’s lumbar support doesn’t go low enough (this is more likely to be the case for smaller users), consider sitting on a cushion.
  • Lumbar support depth – should be adjusted to fill the small of your back. Pay attention to comfort, but err on the side of more aggressive support – the consequences of an insufficient lumbar curve are more serious than those of an excessive one.
  • Armrests (if you’re using them) – should be slightly (less than 1 cm) below desk level.

The #2 mistake is not having proper contact with the backrest. Your back should be as far back as possible. If you leave empty space between your back and the backrest, you’re making it possible to slouch. If your seatpan allows back–forward adjustment, make sure it is as far back as necessary to fully support your butt.

Plant your feet flat on the floor. Stretching your legs in front of you is OK as a brief break, but it will pull your upper thighs forward and up (the edge of your seat will act as the fulcrum). Since your thighs are attached to the bottom part of your pelvis, and the rear part of the pelvis is weighed down by your entire upper body, the pelvis will rotate backward (meaning that the top part of your pelvis will move backward). Since your spine is attached to the top part of the pelvis, this backward motion will push out your lumbar spine, which is connected to the top part of the pelvis. This is exactly what you want to avoid.

What kind of exercises can I do?

Being sedentary is bad for your back because it starves and weakens your intervertebral discs. But much worse than that is exercising improperly. The link between sitting and back problems is indirect; the link between flexing your back and back problems is obvious and direct. That is why it makes sense to avoid bending your back when exercising – this means no more exercises like sit-ups (including hanging sit-ups), crunches, deadlifts, pulling your knees to your chest, bending over to touch your feet, etc. As long as you follow that rule, any moderate form of exercise will probably be good for your back, whether it’s walking, swimming or running.

Whether or not we spare our backs in the gym, we all have to flex them in our daily lives. We have to lift heavy objects like chairs, bend over to pick something up, put our shopping bags into the trunk, etc. All of those movements add up to cumulative damage. It’s possible to do these everyday activities in a way which puts less stress on your spine. This requires two things:

  1. the proper technique (more on that later)
  2. strong muscles that are able to hold your back in a healthy position

#2 means that it’s a good idea to strengthen your “core” (your back and abdominal muscles) through exercises. Fortunately, you can achieve great results with back-safe exercises which don’t involve flexing your spine.

Probably my favorite exercise is “stir the pot“, which not only seriously challenges your abs, but also doesn’t make you flex your lumbar spine. The only disadvantage is that it requires a stability ball and reasonably good balance, as you could hurt yourself if you slide off the ball.

Stuart McGill recommends a trio of exercises which is called the “McGill’s Big Three”. Like “stir the pot”, these are designed to strengthen your core while sparing your back.

  • Curl-up
  • Side bridge
  • Bird-dog

All the exercises discussed above are demonstrated by Stuart McGill in this video:

Here are some individual videos for the curl-up, side bridge and bird-dog.

Another exercise I really like is kneeling on an exercise ball. It looks like this:

You’re supposed to just kneel like this, with your arms down your sides, for something like 10 minutes. This works your entire core because you have to constantly correct your balance with either your abdominal muscles or your back muscles (if you are mostly using your leg muscles or your arm muscles, you’re doing it wrong). It looks easy when you watch YouTube videos made by fitness pros, but if you don’t have a great sense of balance, it will be fiendishly difficult to stay on for even a couple seconds. The best way to do this exercise for the average Joe is the way recommended to me by my physical therapist:

  • Use a table to get onto the ball. All the videos on YouTube show people getting on the ball without extra help, but this is challenging even for a fit person, and increases the probability of an accident (e.g. bumping your head on something).
  • Kneel next to a table or some other object which you can grab if you start to lose your balance. Start by kneeling with both of your hands on the table; as you get more confident, take one hand off, or use only one finger.
  • It’s easier to do this exercise if your Swiss ball has less air in it.
  • Start with just a few minutes, then work your way up. You can overload your muscles if you do it for too long.

This exercise is probably not recommended for people with impaired balance and/or fragile bones, as it’s possible to hurt yourself when you fall off the ball (and you will fall off a lot, trust me). It is also necessary to make sure there are no objects with sharp edges around you that you could fall on.

I like this exercise for two reasons: (1) I can watch stuff on my computer as I do it, (2) it gives me a feeling of progress, as I can really feel my back muscles getting stronger and my balance getting better. I went from less than 2 seconds (essentially falling off the moment I took my hands off the table) to over 5 minutes.

How do I lift things safely?

  • Keep the object as close to your body as possible. The further away the object, the larger the force that’s crushing your vertrebrae together. Lifting an object weighing 10 kg in a stooped position places 100 kg of force on your back due to the mechanical disadvantage of your back muscles.
  • Avoid picking up heavy objects from the ground – this forces you to bend over excessively. Try to grasp objects as high as possible. If necessary, tilt them into a position that allows you to grab them higher. Don’t put objects on the ground if you’re going to have to pick them up again.
  • Try to split heavy objects to avoid carrying them in one go.
  • Avoid twisting your back. Your back can take much more when it’s straight. If you’re going to lift something, make sure it’s right in front of you, not to your left/right (which would force you to twist your torso). When moving around, make turns with your feet. Your hips and your trunk should move as a single unit.
  • Don’t lift shortly after getting up in the morning. Intervertebral discs contain more fluid in the morning (as a result, you are actually taller when you get out of bed), which increases the risk of injury.
  • Don’t lift immediately after prolonged sitting or stooping. Having your back flexed deforms your discs. They need some time to regain their shape before you subject them to loads. Spend a few minutes walking or standing before you start lifting.
  • Lock your lumbar spine in the neutral position, in which it is most resilient, and bend your hips and knees instead (see photo and video below). Your knees should be roughly above your feet (you should sit “back”, not “down”). When lifting, pull your hips forward while pulling the weight up your thighs. This is how Olympic powerlifters do it (if they didn’t, they would all be in wheelchairs). It does not come naturally, so don’t just read about it – go ahead and practice at least a couple times. You’ll also need strong back muscles to stiffen your back for this technique.
  • When lifting light objects off the floor, use the “golfer’s lift”, which keeps your spine straight (see photo below).

Photos showing two correct lifting techniques: the squatting technique and the "golfer's lift"

(top left) incorrect lifting form with lower back flexed; (bottom left) correct form with bent hips and knees; (top right) spine-conserving “golfer’s lift” [images from Low Back Disorders by S. McGill]

Here’s a video demonstration of spine-conserving lifting technique:

What kind of chair should I sit on?

Read my article: “How to buy a good office chair


→ 7 Comments

In search of a quiet PSU: Second Edition

The world of computer power supplies is a strange one. We have smart, knowledgeable reviewers like Aris Mpitziopoulos of Tom’s Hardware or Jeremy Schrag of JonnyGuru going into pornographic detail describing 1% differences in efficiency or voltage stability, even though such things never make a noticeable difference in real life (assuming you’ve bought a decent, brand-name PSU). Meanwhile, electrical noise (generally known as “coil whine”), which affects the user’s daily comfort in a very tangible way, barely gets mentioned.

I am not an EE nerd who salivates over ripple graphs. I’m just a guy who wants a solid PSU that doesn’t make noise, just like in the old days. The last time I was looking for a new PSU was in 2012 – the search ended in a resounding defeat. I spent dozens of hours testing five different power supplies. In the end, every single one had more electrical noise than my Corsair HX520 from 2007, though one of them (the entry-level Be Quiet! model) came close. In the end, I just decided to stick to my old Corsair. After 10 years of constant use, it’s working perfectly well, thanks for asking.

If I’m so happy with my HX520, why am I writing a new post about PSUs? Well, I recently bought a new video card (a GTX1070 from MSI). As every silent PC enthusiast knows, modern graphics cards generate tremendous amounts of coil whine, and my unit is no different. Tellingly, my HX520, which was dead silent with my previous card (an AMD HD7850), started making electrical noise – specifically, reproducing the coil whine of the video card. I know it isn’t just the noise of the card bouncing around, because I took the PSU out of the case and put my ear to it. This seems to suggest that maybe my beloved Corsair isn’t as spotless as I thought.

The second reason is that, when I was buying the GTX1070, I got into a conversation with the salesman about coil whine. He mentioned that he used to have a huge coil whine problem on his card, but that he managed to reduce the noise by getting a new PSU.

Finally, I was also curious to see if the acoustics of power supplies had improved over the past 5 years.

So I ordered three PSUs – all of them praised on the Internet for being particularly quiet: the Corsair RM650x, the Be Quiet! Pure Power 10 600W, and the BitFenix Whisper M 550W.

What’s your setup?

  • Motherboard: Asus P8Z77-V Pro
  • CPU: Intel i5 3570K (overclocked to 4.1 GHz)
  • Video card: nVidia GTX1070 (MSI Gaming X 8 GB)
  • 1 SSD drive and 1 very quiet mechanical hard drive (WD Red 2 TB)
  • Case: Fractal Design Define R4, all optional vents are closed
  • Case fan: 140 mm at 600-700 rpm (in the back of the case)
  • CPU fan: 120 mm at 600-700 rpm
  • GPU fan: I had the fan off while testing the PSU noise (of course not for long)

The computer is about 1 meter away, under a heavy desk. There’s a carpet on the floor.

How did you test for coil whine?

I ran a number of applications that place a high load on the GPU: the Unigine Valley benchmark, the Kombustor benchmark, Far Cry 4, The Witcher 2, Mass Effect 3, Grand Theft Auto IV, Dishonored 2, and Deus Ex: Mankind Divided. Some of these are older titles, because I wanted to generate high framerates (which are known to lead to coil whine). I tested each application with vsync off and on. Predictably, turning vsync on (with a 60 Hz monitor) eliminated coil whine or made it very faint.

Corsair RM650x

I’m a big fan of the Silent PC Review forums. The kind people over there truly care about computer silence, so if they say that some piece of hardware is silent, I know that’s the case. The only other site whose opinions on PSU noise are worth reading is Tom’s Hardware, because they publish the rpm graphs of PSU fans, rather than useless decibel measurements (I know that a 500 rpm fan is inaudible in my setup, but I don’t know what 18 dB means, especially that the sound pressure level depends on the distance at which you take the measurement.)

The Corsair RMx line is probably the most recommended PSU on SPCR. If you also consider my good experiences with the HX520, you see why the Corsair RM650x instantly landed at the top of my shortlist.

The RMx PSUs are semi-passive, which means that the fan in the PSU only turns on when the power drawn by the computer and/or the temperature inside the PSU exceeds a certain threshold. Under “average” conditions, the RM650x is supposed to run fanless up to 260 W, which is why I chose it over the RM550x, for which the threshold is 225 W. (As it turned out, that wasn’t the best decision.)

Now for the big question: is it quiet? Yes, it’s very quiet! To my genuine surprise, the overall electrical noise generated by the GTX1070 + RM650x duo was much lower than for the GTX1070 + HX520. This was true across all the tested apps. Essentially, what seemed to happen was that the PSU was now near-silent (save for some light buzzing that’s inaudible from more than 30 cm) – the only coil whine was coming out of the video card. As a result, the overall electrical noise was cut in half. The boys at SPCR didn’t lie. The Corsair RM650x is an excellent PSU for the silent PC enthusiast.

After an hour or two of testing, I couldn’t help but notice that the PSU case got quite hot – hot enough that I couldn’t touch it for more than a couple seconds (so probably > 40°C). This was despite the fact that I was working with an open case and the unit was supplying no more than 300 watts – and even that, only for brief periods. I am certain that the Japanese capacitors used by Corsair, which are rated for 105°C, will take the heat without breaking a sweat. That’s not the issue. The problem is that the PSU radiates heat into my case. I can, of course, remove the excess heat by cranking up my case fan. But then I would end up with noise because the case fan would cross the threshold of audibility. Suddenly, the “dead silent” PSU doesn’t seem so silent anymore.

Testing the RM650x made me realize that I am not a fan of semi-passive power supplies. I would much rather have a PSU with an always-on 500 rpm fan (which I won’t hear anyway) that will help expel hot air out of my case.

Here are some other thoughts about the Corsair RM650x:

  • The fans didn’t immediately switch on after maximizing the power draw with IntelBurnTest and Kombustor simultaneously (reaching total system power of 300 W). It took a few minutes for that to happen, which suggests that the fan speed depends not just on power, but also temperature or time. The fan also stayed on for at least 5 minutes after the test apps were closed. In the Tom’s Hardware review, the fan on the RM550x (the lower model) didn’t turn on below 275 W. (And, according to Corsair, the threshold is higher in the RM650x.)
  • The fan was very quiet once it switched on. I couldn’t hear it even with my head next to the case – the case and CPU fans in my system completely drowned it out. In fact, I had to look to make sure it was running. In the Tom’s Hardware review of the RM650x, the fan turned on at about 325W, slowly reaching 600 rpm at 375 W, then staying at 600 rpm until about 450 W. It’s risky to make statements about a subjective thing like noise, but 600 rpm in a fan located at the bottom of a case should be inaudible to almost everyone, even in the middle of the night. I would therefore expect this PSU to be practically silent in even the most high-powered single-GPU setups.
  • The fan seems to be of a high quality. Unlike with the other two review units, I couldn’t hear any clicking, even with my ear next to the fan.
  • The motherboard ATX connector is hard to plug in. I had to push so hard that it bent the motherboard PCB. Not cool.
  • When I first turned the PSU on, it blew out a fuse in my apartment. The capacitors fill up too quickly, which creates excessive current. I’ve seen reports of this problem with this specific PSU (not sure about the RM550x). If you’re one of the people who turn off their PSU (or the power strip connected to the PSU) at the end of the day, and you want to buy the RM650x, I suggest getting it from a store with a good return policy.
  • The PSU uses daisychained VGA cables, which is nice, because you can connect a card with two power inputs using just one cable.
  • The Corsair RM650x has a crazy 10-year warranty. Talk about having confidence in your product!

Be Quiet! Pure Power 10 600W

After the encouraging experience with the Corsair, it was time to hook up the Be Quiet. The Pure Power 10 is the successor of the Pure Power L8 model that almost won my last PSU comparison, so I was very interested to see if the current generation lives up to that.

The answer is yes! The Be Quiet! Pure Power 10 600W is a very quiet PSU. My electrical noise tests yielded results on par with the Corsair RM650x. Since I don’t have two identical PCs to do a side-by-side comparison, I had to rely on impressionistic notes to compare the PSUs (e.g. “when playing the Witcher 2 at 170 fps at 3 am, the coil noise is barely noticeable when the computer is under the desk”), but – as far as I can tell – these two models are equally quiet in terms of electrical noise.

The Pure Power 10 is not a semi-passive PSU, but the fan spins at a leisurely pace and, in practice, I wasn’t able to hear it over the sound of the rest of my system. In my stress tests, with a total load of 300–350 watts, I was unable to hear the fan spinning up, despite having the PSU just 30 cm away. According to this eTeknix review, the fan stays below 560 rpm up to about 80% load, which explains the excellent noise performance of this model. The active fan of this PSU has a clear advantage over Corsair’s semi-passive solution – the PSU stayed much cooler, even under a heavy load, while still staying inaudible. It seems there is a big difference between 0 rpm and 560 rpm in terms of cooling.

Some further observations about the Be Quiet! Pure Power 10:

  • The Pure Power 10 uses mediocre Chinese capacitors which are rated for 85°C, unlike most enthusiast PSUs nowadays, which use Japanese capacitors rated at 105°C. Heck, even my old Corsair HX520 is 100% Japanese 105°C (which might explain its longevity). Be Quiet clearly views the Pure Power 10 as a budget unit – which is kind of funny, because it only costs €20 less than the RM650x, at least here in Poland.
  • The fan (or something close to the fan) makes soft clicking noises at random intervals. This is only audible when the fan is pointing directly at your ear.
  • There is some doubt about the type of fan used on the Pure Power 10. The official spec says it’s a rifle-bearing fan, while Tom’s Hardware says (in their review of the Pure Power 9, which has the exact same fan model number: BQ QF1-12025-MS) “our sources indicate that the cooling fan has a sleeve bearing”.
  • The Pure Power 10 has a relatively short warranty of 3 years. This could indicate that Be Quiet does not expect the capacitors and/or the fan to last more than a few years.
  • The VGA cable is a little too short. An extra 5 cm would have made it possible to route it a bit better in my Fractal Define R4 case. As on the RM650x, it is daisychained, which allows you to connect two VGA power sockets with one cable.

BitFenix Whisper M 550W (BWG550M)

BitFenix is not normally considered one of the top PSU brands, but their latest Whisper M line has earned a recommendation from Tom’s Hardware and is based on the latest platform from CWT, the company that makes power supplies for Corsair.

The crucial difference between the Whisper and Corsair RMx is that the Whisper has an active fan, which keeps the PSU much cooler. The difference is quite dramatic and can be easily felt by touching the PSU chassis after playing a demanding game for 30 minutes. At the same time, BitFenix gave the fan a very quiet profile: in the Tom’s Hardware test, it stayed at 400 rpm up to 325 W, then slowly spun up to 600 rpm at 375 W – this is at ambient temperatures of 34–46 °C. The fan’s speed is temperature-dependent, so if the temperature inside your case is lower (it likely is), you will be able to reach higher wattage while staying below 600 rpm. In my tests, I was unable to make the fan audible over the rest of my system, despite stress testing my system rather vigorously, and sitting right next to the PSU.

What about the primary target of this comparison – coil whine? I’m happy to report that the BitFenix Whisper M 550W is every bit as coil-whine-free as the Be Quiet! and the Corsair.

Some more comments on the BitFenix:

  • The Whisper uses an FDB fan, which is theoretically very good, but – according to Tom’s Hardware – the model they used is only rated for 30,000 hours. At 12 hours a day, this is only 7 years, though one can hope that the slow rotational speed will extend the lifetime.
  • The fan has the same random clicking disease as the fan on the Be Quiet, except that the clicking happens more frequently. It’s inaudible unless the fan is facing you – the only problem is that it makes me worry about the long-term reliability of the fan.
  • The PSU uses a 135 mm fan. If you ever need to replace it, good luck finding a quality fan in that size.
  • The VGA power cable is not daisychained, which means that I need to route two separate cables from the PSU to my nVidia 1070 card.
  • On the other hand, the SATA power cables are super-long with 4 connectors each. This is the first PSU that has allowed me to connect my DVD-ROM and two hard drives with one cable.
  • The ATX cable is made up of 4 separate ribbons. I’m not sure what BitFenix was thinking here, but these cables take up more space than a standard sleeved round cable, and are more difficult to route behind your motherboard because you need to place them flat against the motherboard tray (at least my case wouldn’t close otherwise), which is very hard because they’ll twist around. In the end, I gave up and routed the ATX cable behind my hard drives, which is not ideal. Ribbons are a bad idea for huge cables!
  • The ATX plug is huge because it houses a bunch of capacitors to further reduce ripple (see here for photo). As far as I can tell, this accomplishes no useful goal, other than impressing the EE nerds who write PSU reviews. I love EE nerds, but that damn plug makes it harder to route the ATX cable and I daresay even blocks some airflow to the RAM sticks. At least the plug itself goes in and out easily, unlike on the Corsair RMx. It’s also a 24-pin plug, so there’s none of the 20+4 nonsense to deal with.
  • BitFenix backs the Whisper M with a 7-year warranty. Not as good as Corsair’s 10 years, but still very nice.
  • At the time of this writing, the BitFenix Whisper M 550 W is only €5 cheaper than Corsair RM550x.

Decisions, decisions

Well, what do you know – the quality of computer power supplies seems to have gone up over the past few years. Whereas five years ago I had to concede defeat in my quest to find a PSU to equal my almost ancient Corsair HX520, this time I have gotten my hands on no less than three PSUs that reduce the overall electrical noise in my system by about 50% when paired with my MSI Gaming X 1070 graphics card.

In a quiet room in the middle of the night, with a well-insulated case placed under a desk, I can just notice some coil whine (usually a kind of buzz) in demanding applications, especially with high framerates. I have to make a bit of an effort to hear it. If I put the computer on the desk, or had a less insulated case, it would of course be a different story. Is that a result I’m totally happy with? Heck no. I believe electrical devices should not be heard (unless they’re speakers). But until video card manufacturers start designing less noisy products, it’s a result I can live with.

With all the tested PSUs offering virtually identical performance in the noise department, I have to make a decision based on secondary considerations:

  • The Corsair RM650x is an excellent model with quality components and a crazy long warranty, but the semi-passive cooling means it runs quite hot, even without extreme load. I don’t want to deal with extra heat in my already hot case, so the Corsair was the first PSU that I eliminated. (The lower-rated brother, Corsair RM550x, turns on the fan a bit earlier, but the threshold is only 35W lower and it wouldn’t make much of a difference.)
  • The Be Quiet! Pure Power 10 600W runs much cooler than the Corsair, but the cheap Chinese capacitors and the relatively short warranty make me worried that it will not last more than a few years. (The higher-end Straight Power model also uses Chinese caps. Be Quiet! has announced a new generation of the Straight Power, to be released in the fall of 2017, which will have 100% Japanese caps.)
  • My personal winner? The BitFenix Whisper M 550W. It combines the cool operation of the Be Quiet! with the uncompromising component quality of the Corsair. The long-term reliability of the fan is a bit of an unknown in light of the unimpressive 30,000 h rating, and the non-typical fan size would make replacing it a challenge – if anything goes wrong, I will just have to use the 7-year warranty.

→ 10 Comments

Review of the Dell U2415 LCD monitor

It was 7 years ago that I last bought a display for my desktop PC. The display I picked then – the Dell 2209WA – is still kicking, although it has begun to show signs of advanced age. The CCFL backlight has yellowed and dimmed, and the panel now has a weird dark smear in its left half. It is a display that doesn’t believe in climate change, happily guzzling 50 watts of power and giving off enough heat to make the entire backplate hot to the touch.

So far, my display strategy has been to hold off on an upgrade until someting really great comes along. “Maybe this year we’ll finally get affordable OLED displays? Maybe this is the year that Windows gets proper support for Retina screens?”, I would think, every year – until I got tired of waiting and decided to order the Dell U2415, a display that Wirecutter has singled out as the best 24″ monitor. I admit one of my reasons was curiosity – I wanted to see how much display technology has improved in 7 years. With so many commenters gushing over the picture quality on the U2415, maybe I was missing out?

[Read more →]

→ 4 Comments